Scaling ML using Cloud ML Engine
- Documentation enryh.github.io/gcp_ml_engine_talk
- Repository with notebooks github.com/enryh/gcp_ml_engine_talk
- orignal project github.com/tarrade/proj_DL_models_and_pipelines_with_GCP
Me on Twitter: @Henrywebel
Contents
- Data Science Workflow
- Developing code
- Hands-ON Tutorial: Running MNIST on ML-Engine
- Setup Runtime for Notebook
- Load Data from BQ
- Package Model
- Train using ML-Engine
- Deployment
- Predictions
- Recap
- Appendix: Jupyter Slides
Shortcut: Run first cells and jump to any part in the notebook
Will only work after initial setup (see below) !
# Fragment to initalize working with this notebook on the CLOUD
# check working directory
from utils import chdir_
pwd = chdir_()
## Import Tensorflow
try:
    import tensorflow as tf
except ModuleNotFoundError:
    raise ModuleNotFoundError("Install Tensorflow")
tf.__version__
## import config:
import yaml
from pprint import pprint
with open("config.yaml", "r", encoding = "utf8") as f:
    config = yaml.safe_load(f)
pprint(config)
## setup env-variables
import os
import platform
PROJECT = config['project-id']
REGION = config['region'] # Choose an available region for Cloud MLE from https://cloud.google.com/ml-engine/docs/regions.
BUCKET = config['bucket'] # REPLACE WITH YOUR BUCKET NAME. Use a regional bucket in the region you selected.
PKG_NAME = config['pkg-name']
TEST_DATA_JSON = config['testdatafile']

os.environ['PROJECT'] = PROJECT
os.environ['BUCKET'] = BUCKET
os.environ['REGION'] = REGION
os.environ['TFVERSION'] = str(config['tf-version'])  # Tensorflow version 1.4 before
os.environ['PKG_NAME'] = PKG_NAME
os.environ['TEST_DATA_JSON'] = TEST_DATA_JSON
# Set new OUTPUT and DATA directory on GS
OUTDIR = '/'.join(['gs:/', BUCKET, PKG_NAME, 'trained'])
DATA = '/'.join(['gs:/', BUCKET, PKG_NAME, 'data', 'mnist.npz'])
%env OUTDIR $OUTDIR
%env DATA $DATA
import sys
local_python = sys.executable
%env PYTHON_LOCAL $local_python
%%bash
gcloud config set project $PROJECT
gcloud config set compute/region $REGION
gcloud config set ml_engine/local_python $PYTHON_LOCAL
Data Science Workflow (DSP)
- Goal is to standardise the development of models
- Checklist of necessary technical steps
Vision: Achieve an first end-to-end model in production within a productincrement of 10 weeks
Scale out: Scale without having to rewrite your model
Data Science Pipeline (DSP) - Checklist
- further documentation
Scaling Michelangelo - Data Science Process at Uber
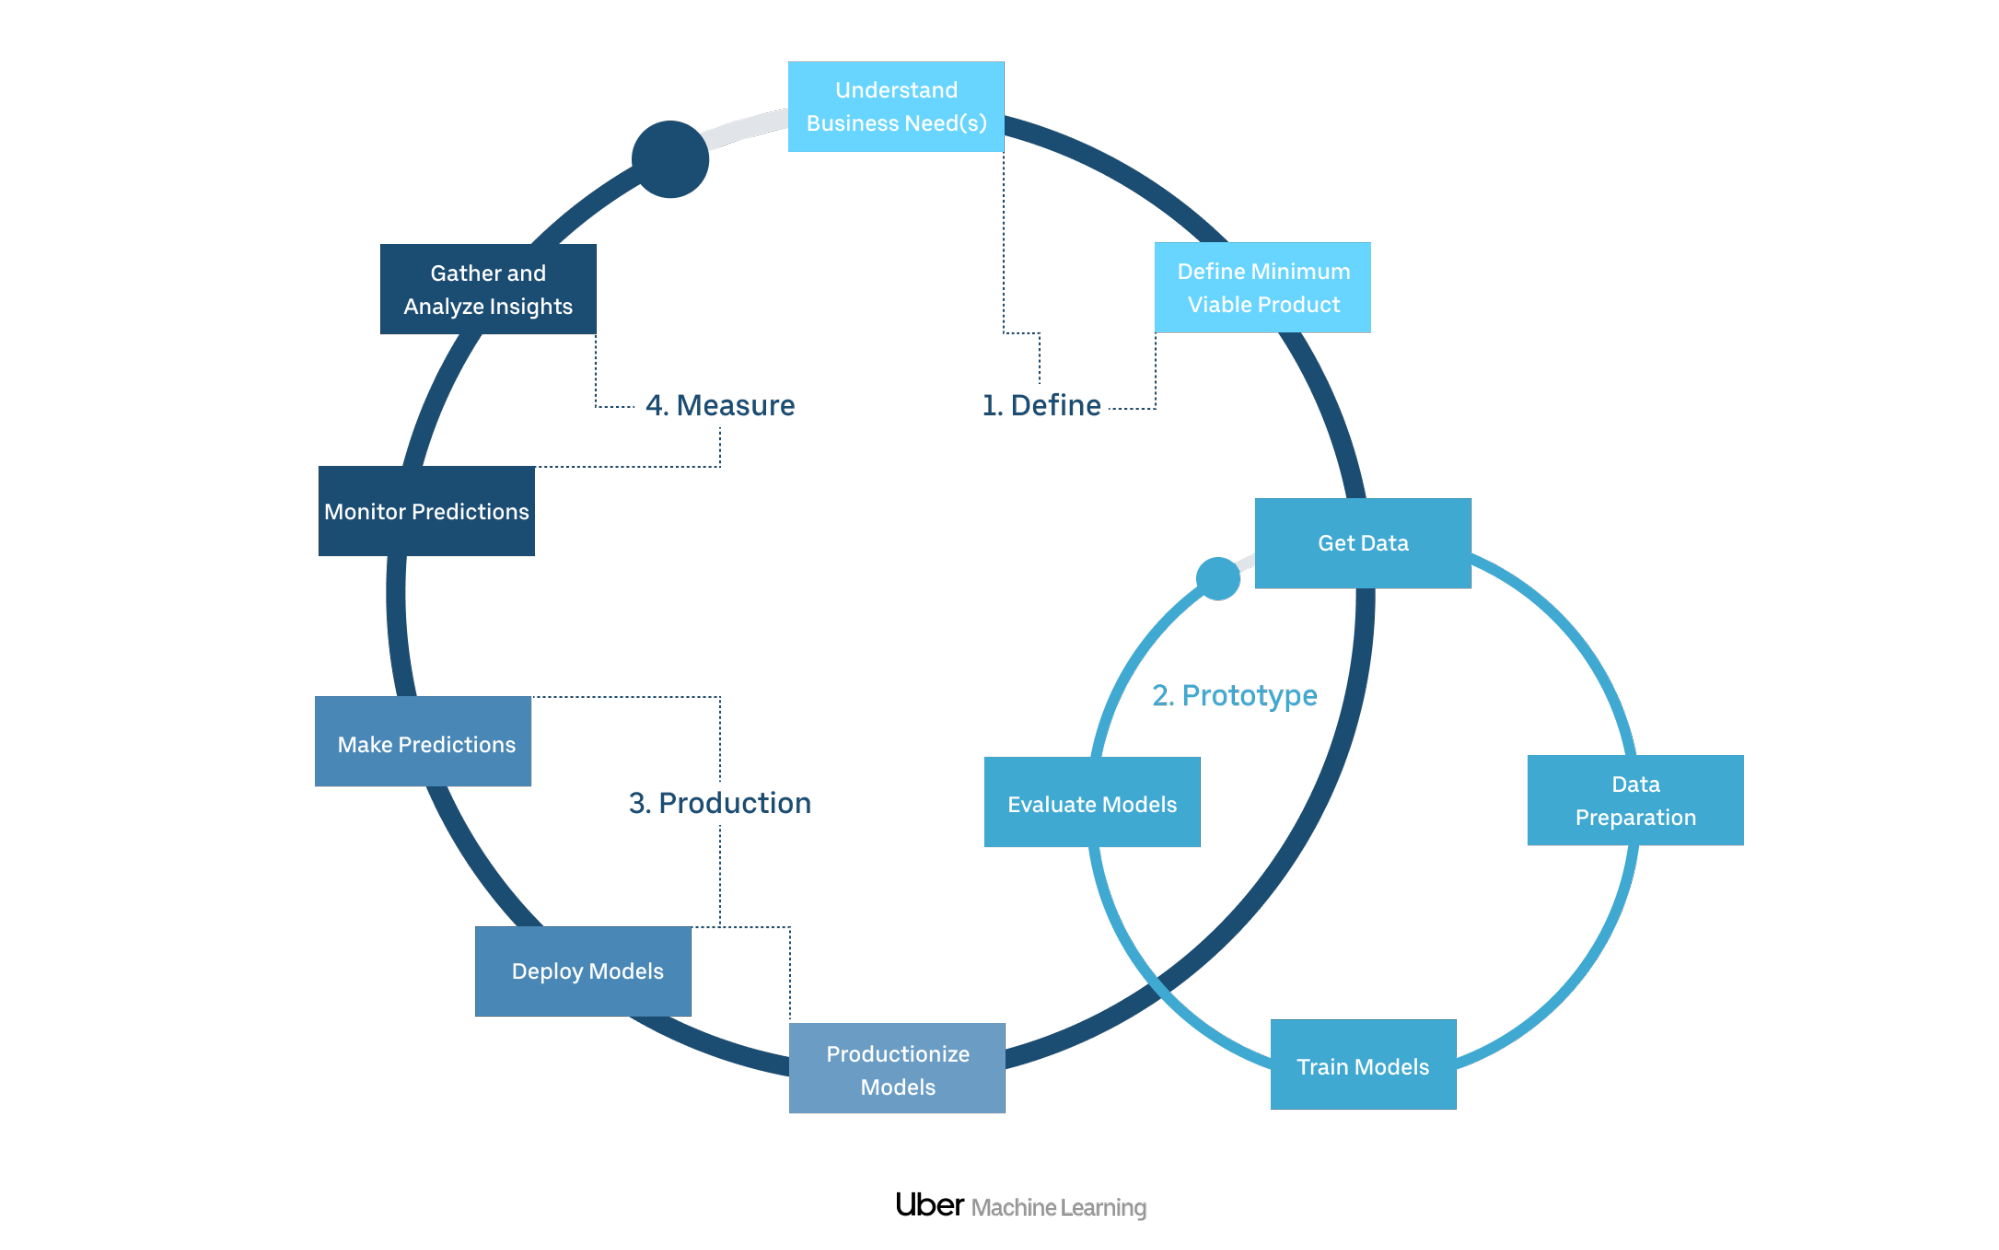
| Step 1: Preparation | Step 2: Data exploration and model building | Step 3: Model deployment |
|---|---|---|
| 1.1 Define business and project goal | 2.1 Define and setup ML project infrastructure | 3.1 Model industralization |
| 1.2 Quick data exploration | 2.2 Data exploration and visualizaiton | 3.2 Gather and analyze insightbalancing ...) |
| 1.3 ML models strategy | 2.3 Build and evaluate a model | - |
| - | 2.4 Interpretability of ML model | - |
| - | 2.5 Productionize and deploy the ML models | - |
steps 1 and 2 can be done only locally
Developing code
Using your own laptop:
- Cloud SDK on your laptop (CLI)
- your IDE (e.g. PyCharme)
- Juypter Notebook
- your conda env
gcloud ml-engine local
Simple Cloud setup using
- Google Console -Compute Engine with 5 GB storage
- Cloud Editor
- datalab, Deep Learning VM
- env (runtime) by google
gcloud ml-engine(local)
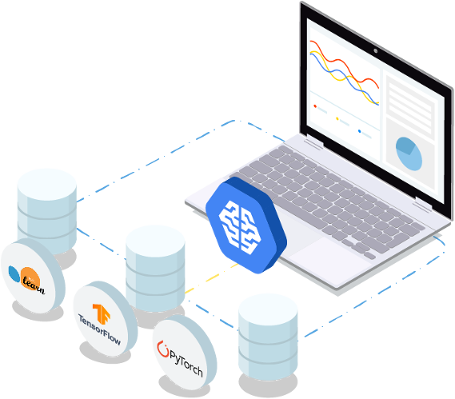
Your laptop
![]()
- Call your python script (module) in your conda env
- Use
gcloud ml-engine local train
AI Platform Notebooks: Deep Learning VM
- Preconfigured (Deep Learning) VMs for ML prottyping
- only CPUs possible
- you use a preconfigured runtime compatible to ML Engine runtimes for deployment
A cluster of machines using ML-Engine service

- runs a script "autonomously" on the cloud and stops afterwards
- offers to run different type of clusters
- invoked by
gcloud ml-engine train
Summary
develop on your laptop if you are comfortable with setting up your environements
otherwise develop on a preconfigured Notebook instance without too many compute attached to it
Migrate to ML-Engine Cluster on GCP to
- distribute learning on several machines
- serve model 24/7
Hands-ON Tutorial: Running MNIST on ML-Engine

- deep dive into step 2 and 3 of proposed Data Science process
- data exploration is omitted since a curated dataset is used
- Some title reference to previously described Data Science Process, e.g. DSP 2.3
Adapted from Notebook of Google Coursera Course Serverless Machine Learning with Tensorflow on Google Cloud Platform. The current code respository is github/tarrade/tarrade/proj_DL_models_and_pipelines_with_GCP/

- black and white images are numeric vectors (Feat 1- 784)
- ten labels (Figures 0-9)
- recognise hand-written digits (e.g. on a postal card)
- standardise inputs to 0 - 1 range (e.g. using BEAM)
GCP services used in Tutorial
We will look today at following GCP Services-
- BigQuery (BQ)
- Cloudstorage (Buckets)
- ML Engine
- If time allows: Dataflow using Apache Beam
DSP 2.1: Setup
- ML Engine Runtimes
- Repository Structure
- Configuration Variables
- Environment variables to set
- How to add them to your runtime
- Setup
gcloudruntime
Create conda environment
 conda env create -f environment.yml -n gcp_dl
 conda activate gcp_dl
 jupyter notebook
Starts notebook-server with all packages in your current path
Change working directory
- In order to import from
srcfunctionality later in this notebook, it is necessary to change to the root directory of the notebooks directory
# check working directory
import os
WORKINGDIR = os.path.normpath(os.getcwd())
print("Current Working direcotory:\t{}".format(WORKINGDIR))
folders = WORKINGDIR.split(os.sep)
if folders.pop() in ['notebook', 'src', 'talks']:
  WORKINGDIR = os.sep.join(folders)
  print("Changed to New working directory:\t{dir}".format(dir=WORKINGDIR))
  os.chdir(WORKINGDIR)
ML Engine Runtimes
Default ML-Engine Runtimes depend on the Tensorflow Version
- list of runtimes
- Current Version:
1.13
#!conda install tensorflow=1.13
import tensorflow as tf
tf.__version__
Repository structure
ls | grep "DIR\|yaml"
Key Directories containing information
.
+-- data
+-- src
|  +-- models
|  +-- packages
config.yaml
In the next step the contents of config.yaml will be important
GCP Environment Variables
PROJECT_ID: unique ID that identifies your project, e.g. ml-productive-pipeline-12345BUCKET: BLOB-store ID. Each project has per default an bucket named by thePROJECT_IDREGION: Which data center to use
All Cloud-ML-Engine Services are only available in
europe-west1
- all products per Region in europe: link
# #Create config manually and save as yaml:
config = {}
config['project-id'] = 'ml-productive-pipeline-12345'  # # REPLACE WITH YOUR PROJECT ID
config['region'] = 'europe-west1' # Choose an available region for Cloud MLE from https://cloud.google.com/ml-engine/docs/regions.
config['bucket'] = 'ml-productive-pipeline-12345'  # REPLACE WITH YOUR BUCKET NAME. Use a regional bucket in the region you selected.
config['pkg-name'] = 'pkg_mnist_fnn'
config['tf-version'] = '1.13'
config['env-name'] = 'gcp_dl'
with open("config.yaml", 'w', encoding= 'utf8') as f:
      yaml.dump(config, stream=f,  default_flow_style=False)
ML-Engine Environment Variables
Additional Environment Variables needed for ML-Engine
PKG_NAME: Package Name which will contain your modelTF_VERSION: Tensorflow Version
import yaml
from pprint import pprint
with open("config.yaml", "r", encoding = "utf8") as f:
    config = yaml.load(f)
pprint(config)
Adding Environment Variables to your runtime
- add variables persistently to the runtime of your kernel from jupyter (or datalab)
- use
os.environdictionary - behind a proxy, configure globally
REQUESTS_CA_BUNDLE: optional, filepath to your SLL-certificate (works forrequest-package)HTTPS_PROXY: optional, link to your proxy, possibly includign authentification or ports
- possiblity to set
environment variablesfor user permanently
## setup env-variables
import os
import platform
PROJECT = config['project-id']
REGION = config['region'] # Choose an available region for Cloud MLE
BUCKET = config['bucket']
PKG_NAME = config['pkg-name']
#TEST_DATA_JSON = config['testdatafile'] # added later

os.environ['PROJECT'] = PROJECT
os.environ['BUCKET'] = BUCKET
os.environ['REGION'] = REGION
os.environ['TFVERSION'] = str(config['tf-version'])
os.environ['PKG_NAME'] = PKG_NAME
Access Environment Variables
- Now, you can access the environement variable in the terminal where your jupyter, datalab or ipython.
!echo "Using Tensorflow Version: $TFVERSION"
Setup gcloud runtime
import sys
local_python = sys.executable
%env PYTHON_LOCAL $local_python
Access Control
sign in and let clients pick up credentials from GCloud SDK (this stores a json with your credentials on your machine)
gcloud auth application-default loginService Accounts (Creating and Managing Service Accounts)
- need be assigned read/write permission to
BUCKET
- need be assigned read/write permission to
Load Data: Bigquery Client (DSP 2.2 )
There are several python clients available, see list. Here we use bigquery to load some data.
Picks up PROXY_HTTPS, REQUESTS_CA_BUNDLE, PROJECT_ID from environment
- set all relevant variables as user environment variables
- search "env" in windows search bar (press windows button)
- select "Edit environment variables for your account"
- select "new" and add the PROXY_HTTPS, REQUESTS_CA_BUNDLE, PROJECT_ID
Example: Download from public dataset
# pip install --upgrade google-cloud-bigquery
from google.cloud import bigquery
import os

PROJECT_ID = os.environ['PROJECT']
print("# Current project in use: {}\n".format(PROJECT_ID))
client = bigquery.Client(project=PROJECT_ID)

sql = """
    SELECT *
    FROM `bigquery-public-data.usa_names.usa_1910_current`
    WHERE state = 'TX'
    LIMIT 10
"""
df = client.query(sql).to_dataframe()
print(df)
Download from project table
- use
testDataset with tableDATAof project (has to be created)
sql = """
    SELECT *
    FROM `{project}.test.DATA`
    LIMIT 15
""".format(project=PROJECT)
df = client.query(sql).to_dataframe()
df.head()
sql = """
    SELECT COUNT(label) as count
    FROM `{project}.test.DATA`
    GROUP BY label
""".format(project=PROJECT)
df = client.query(sql).to_dataframe()
df.transpose()
Downloading the entire table to pandas
- BQ Query Default limit of128MB maximum reponse size, see quotas, does not allow to download entire Table
bigquery_storageclient has to be used to download large datasets
import google.auth
from google.cloud import bigquery
from google.cloud import bigquery_storage_v1beta1

# Explicitly create a credentials object. This allows you to use the same
# credentials for both the BigQuery and BigQuery Storage clients, avoiding
# unnecessary API calls to fetch duplicate authentication tokens.
credentials, _ = google.auth.default(
    scopes=["https://www.googleapis.com/auth/cloud-platform"]
)
print("Credentials: {}".format(credentials))
print("PROJECT: {}".format(PROJECT))

# Make clients.
client = bigquery.Client(
    credentials=credentials,
    project=PROJECT
)
bqstorageclient = bigquery_storage_v1beta1.BigQueryStorageClient(
    credentials=credentials
)
Download to pandas dataframe
- can take very long
# Download a table.
table = bigquery.TableReference.from_string(
    "{project}.test.DATA".format(project=PROJECT)
)
rows = client.list_rows(
    table,
    #selected_fields=[
    #    bigquery.SchemaField("label", "INTEGER")
    #],
)
df = rows.to_dataframe(bqstorage_client=bqstorageclient)
df.head()
import numpy as np
np.save(file='data/mnist/raw/mnist_all', allow_pickle=True, arr=df.to_numpy())
Model: Packaging model (DSP 2.3)
Take your code and put into a standard Python package structure, see recommended package structure
Key-Idea:
- define entry point which can be called
- write all tasks as a function (callable)
Why a package?
- can be called from other scripts
import model
model.py
load most recent version, if needed:
Imports, Helper Functions
%%writefile src/pkg_mnist_fnn/model.py
# First try to start Cloud ML uing MNIST example.
import tensorflow as tf
import numpy as np

from .utils import load_data
##########################################################################
#Factor into config:
IMAGE_SHAPE = (28,28)
N_PIXEL = 28 * 28
NUM_LABELS = 10

BATCH_SIZE = 128
EPOCHS = 5
##########################################################################
def parse_images(x):
    return x.reshape(len(x), -1).astype('float32')


def parse_labels(y):
    return y.astype('int32')
Input-Function used when Model is trained
def numpy_input_fn(images: np.ndarray,
                   labels: np.ndarray,
                   mode=tf.estimator.ModeKeys.EVAL,
                   epochs=EPOCHS,
                   batch_size=BATCH_SIZE):
    """
    Return depending on the `mode`-key an Interator which can be use to
    feed into the Estimator-Model.

    Alternative if a `tf.data.Dataset` named `dataset` would be created:
    `dataset.make_one_shot_iterator().get_next()`
    """
    if mode == tf.estimator.ModeKeys.TRAIN:
        _epochs = epochs
        _shuffle = True
        _num_threads = 1 # This leads to doubling the number of epochs
    else:
        _epochs = 1
        _shuffle = False
        _num_threads = 1

    return tf.estimator.inputs.numpy_input_fn(
        {'x': images},
        y=labels,
        batch_size=batch_size,
        num_epochs=_epochs,
        shuffle=_shuffle, # Boolean, if True shuffles the queue. Avoid shuffle at prediction time.
        queue_capacity=1000, # Integer, number of threads used for reading
        # and enqueueing. To have predicted order of reading and enqueueing,
        # such as in prediction and evaluation mode, num_threads should be 1.
        num_threads=_num_threads
    )
Input-Function used when Model is served
def serving_input_fn():
    feature_placeholders = {
        'x': tf.placeholder(tf.float32, shape=[None, N_PIXEL])
    }
    features = feature_placeholders
    return tf.estimator.export.ServingInputReceiver(
         features=features,
         receiver_tensors=feature_placeholders,
         receiver_tensors_alternatives=None
         )
Entrypoint (main function)
def train_and_evaluate(args):
    """
    Utility function for distributed training on ML-Engine
    www.tensorflow.org/api_docs/python/tf/estimator/train_and_evaluate
    """
    ##########################################
    print('## load data, specified path to try: {}'.format(args['data_path']))
    (x_train, y_train), (x_test, y_test) = load_data(
        path=args['data_path'])

    x_train = parse_images(x_train)
    x_test = parse_images(x_test)

    y_train = parse_labels(y_train)
    y_test = parse_labels(y_test)

    model = tf.estimator.DNNClassifier(
        hidden_units= args['hidden_units'],  #[256, 128, 64],
        feature_columns=[tf.feature_column.numeric_column(
            'x', shape=[N_PIXEL, ])],
        model_dir=args['output_dir'],
        n_classes=NUM_LABELS,
        optimizer=tf.train.AdamOptimizer(learning_rate=args['learning_rate']),
        # activation_fn=,
        dropout=0.2,
        batch_norm=False,
        loss_reduction='weighted_sum',
        warm_start_from=None,
        config=tf.estimator.RunConfig(save_checkpoints_steps=400,
                                      keep_checkpoint_max=5,
                                      keep_checkpoint_every_n_hours=1,
                                      train_distribute=None)
    )
    ## to cont.
## to cont.
    train_spec = tf.estimator.TrainSpec(
        input_fn=numpy_input_fn(
            x_train, y_train, mode=tf.estimator.ModeKeys.TRAIN,
            batch_size = args['train_batch_size']),
        max_steps=args['train_steps'],
        # hooks = None
    )
    # use `LatestExporter` for regular model exports:
    exporter = tf.estimator.LatestExporter('exporter', serving_input_fn)
    eval_spec = tf.estimator.EvalSpec(
        input_fn=numpy_input_fn(
            x_test, y_test, mode=tf.estimator.ModeKeys.EVAL),
        # steps=100,
        start_delay_secs=args['eval_delay_secs'],
        throttle_secs=args['min_eval_frequency'],
        exporters=exporter
    )
    print("## start training and evaluation\n"
          "### save model, ckpts, etc. to: {}".format(args['output_dir']))

    tf.estimator.train_and_evaluate(
        estimator=model, train_spec=train_spec, eval_spec=eval_spec)
task.py
write contents to file:
%%writefile src/pkg_mnist_fnn/task.py
# Parse arguments and call main function
import os
import json
import argparse
import shutil
from pprint import pprint

from .model import train_and_evaluate

if __name__ == '__main__':
    parser = argparse.ArgumentParser()
    parser.add_argument(
        '--data_path',
        help='GCS or local path to training data',
        required=True
    )
    parser.add_argument(
        '--output_dir',
        help='GCS location to write checkpoints and export models',
        required=True
    )
    parser.add_argument(
        '--train_batch_size',
        help='Batch size for training steps',
        type=int,
        default='128'
    )
parser.add_argument(
        '--train_steps',
        help='Steps to run the training job for',
        type=int,
        default='200'
    )
    parser.add_argument(
        '--learning_rate',
        help='Learning Rate used for Adam',
        type=float,
        default='0.001'
    )
    parser.add_argument(
        '--hidden_units',
        help = 'Hidden layer sizes to use for DNN feature columns -- provide space-separated layers',
        type = str,
        default = "256 128 64"
    )
    parser.add_argument(
        '--job_dir',
        help='this model ignores this field, but it is required by gcloud',
        default='junk'
    )
    # Eval arguments
    parser.add_argument(
        '--eval_delay_secs',
        help='How long to wait before running first evaluation',
        default=1,
        type=int
    )
parser.add_argument(
        '--min_eval_frequency',
        help='Seconds between evaluations',
        default=5,
        type=int
    )

    args = parser.parse_args().__dict__
    pprint("Arguments:\n{}".format(args))
    args['hidden_units'] = [int(x) for x in args['hidden_units'].split(' ')]
    pprint("Arguments:\n{}".format(args))

    output_dir = args['output_dir']
    # Append trial_id to path if we are doing hptuning
    # This code can be removed if you are not using hyperparameter tuning
    args['output_dir'] = os.path.join(
        output_dir,
        json.loads(
            os.environ.get('TF_CONFIG', '{}')
        ).get('task', {}).get('trial', '')
    )
    print("Save output to: {}".format(args['output_dir']))
    # #######################################
    # # Train and Evaluate (use TensorBoard to visualize)
    train_and_evaluate(args)
Add empty __init__.py to create package
%%writefile src/pkg_mnist_fnn/__init__.py
Add function to load data
%%writefile src/pkg_mnist_fnn/utils.py
import os
import numpy as np

from io import BytesIO
import tensorflow as tf
import numpy as np
from tensorflow.python.lib.io import file_io

def load_data(path='./data/'):
    """
    Load data in memory from local source, from data-repository
    or bucket (ToDo)

    Return
    -----
    x_train: numpy.array
        Shape: (60000, 28, 28)
    y_train: numpy.array
        Shape: (10000, )
    x_test: numpy.array
        s
    y_test: numpy.array
    """
    try:
        _path = os.path.normpath(path)
        with np.load(_path) as f:
            x_train, y_train = f['x_train'], f['y_train']
            x_test, y_test = f['x_test'], f['y_test']
            print("Loaded data from {}".format(_path))
        return (x_train, y_train), (x_test, y_test)
    except Exception
       # to cont.
try:
            f = BytesIO(file_io.read_file_to_string(
                filename=path,
                binary_mode=True
            ))
            data = np.load(f)
            with data as f:
                x_train, y_train = f['x_train'], f['y_train']
                x_test, y_test = f['x_test'], f['y_test']
                print("Loaded data from {}".format(path))
            return (x_train, y_train), (x_test, y_test)
        except Exception:
            try:
                from tensorflow.keras.datasets import mnist
                (x_train, y_train), (x_test, y_test) = mnist.load_data()
                return (x_train, y_train), (x_test, y_test)
            except Exception:
                raise Exception("Not Connection to Server:"
                                "Download manually to ./data/ from {}".format(
                    "https://storage.googleapis.com/tensorflow/"
                        "tf-keras-datasets/mnist.npz"
                ))
Train using ML-Engine
Section shows:
- Conceptual Workflow on GCP with ML-Engine
- Executing the model in different environments (local or on cluster)
- Optimize hyperparameters using ML-Engine in cluster
- Query ML-Engine Endpoint API to extract results
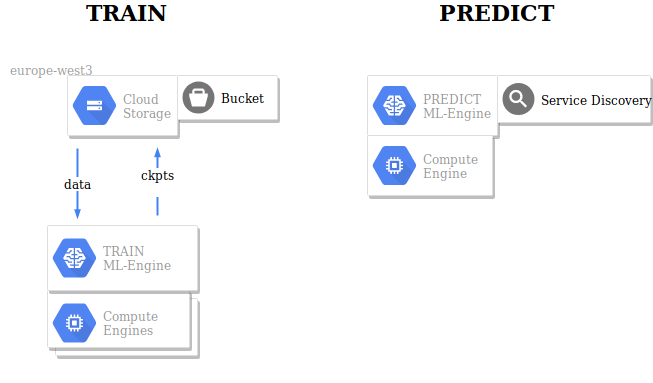
Modeling and ML-Engine
- Environment Variables with absolut paths to relevant folders:
PKG_NAME: Self-Contained Package to be exported intosite-packagesinvenvDATA,OUTDIR: Datafolder and where to store store checkpoints (logs, weights, graph)PWD: where your project folder liesJOBNAME: ID for ML-EngineBUCKET: ID of BucketTIER: Type of Cluster
Adding Code snippets
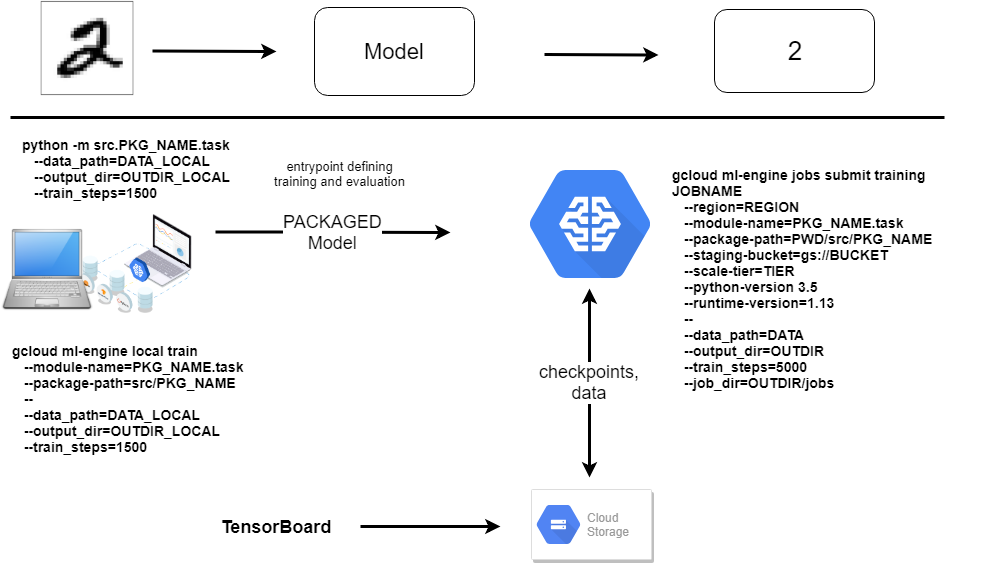
Schematic Overview
Contents ML-Engine Section
- Training
- local (on your machine)
- on cluster (submitting a job)
- Hyperparameter search (on cluster)
Training on your local maschine with your python env
- Set local folders
data_local = os.path.join(os.getcwd(),'data', 'mnist', 'raw', 'mnist.npz')
OUTDIR_local = os.path.join(os.getcwd(),'trained', PKG_NAME)
os.environ['OUTDIR_LOCAL'] = OUTDIR_local
os.environ['DATA_LOCAL'] = data_local

print("Local Data Directory:\t {}".format(os.environ['DATA_LOCAL']))
print("Local Output Dir:\t {}".format(os.environ['OUTDIR_LOCAL']))
import shutil
shutil.rmtree(OUTDIR_local, ignore_errors=True)
os.makedirs(name= OUTDIR_local, exist_ok=True)
os.listdir(OUTDIR_local)
Running the Python module without gcp ml-engine
- Entry point is defined in
task.py- parses command line arguments
- conda env has to be active
%%bash
python3 -m src.${PKG_NAME}.task \
   --data_path=$DATA_LOCAL \
   --output_dir=$OUTDIR_LOCAL \
   --train_steps=1000 \
   --job_dir=tmp
echo "Saved Model, ckpts, exported model to: $OUTDIR_LOCAL"
ls $OUTDIR_LOCAL
Call hidden units parameter
- change model architecture
- here previous model is deleted -> later several model will be compared
import shutil
shutil.rmtree(OUTDIR_local, ignore_errors=True)
os.makedirs(name= OUTDIR_local, exist_ok=True)
%%bash
python3 -m src.${PKG_NAME}.task \
   --data_path    $DATA_LOCAL \
   --output_dir   $OUTDIR_LOCAL \
   --train_steps  1000 \
   --job_dir      tmp  \
   --train_batch_size   128 \
   --learning_rate 0.01 \
   --hidden_units "256 128 64"
echo "Saved Model, ckpts, exported model to: $OUTDIR_LOCAL"
ls $OUTDIR_LOCAL
Saved Model
# Some previous versions might exist, take latest:
os.listdir(os.path.normpath("{}/export/exporter".format(OUTDIR_local)))[-1]
And we would be ready to deploy
... but of course not without looking at performance metrics or predictions!
Training using gcloud ml-engine local train
- continue training using
ml-engine local - needs full-paths for out-dir: Add
$PWD
import shutil
shutil.rmtree(OUTDIR_local, ignore_errors=True)
os.makedirs(name= OUTDIR_local, exist_ok=True)
%%bash
gcloud ml-engine local train \
   --module-name=${PKG_NAME}.task \
   --package-path=src/${PKG_NAME} \
   -- \
   --data_path=$DATA_LOCAL \
   --output_dir=$OUTDIR_LOCAL \
   --train_steps=5500 \
   --job_dir=./tmp
!gcloud ml-engine local train --help
Training Cloud using gcloud ml-engine train
- a copy of the data is in Google Storage (buckets)
gcloud ml-engineoutput is saved toOUTDIRin Google Storage- checkpoints (logs)
- model graph and weights
- data is copied to Google Storage (see console)
#Set JOBNAME
import datetime
JOBNAME = 'mnist_' + datetime.datetime.now().strftime("%y%m%d_%H%M%S")
%env JOBNAME {JOBNAME}
# Set new OUTPUT and DATA directory in GS
OUTDIR = '/'.join(['gs:/', BUCKET, JOBNAME])
DATA = '/'.join(['gs:/', BUCKET, PKG_NAME, 'data', 'mnist.npz'])
%env OUTDIR $OUTDIR
%env DATA $DATA
Data Transfer
%%bash
gsutil -m cp ${PWD}/data/mnist/raw/mnist.npz ${DATA}
gsutil ls ${DATA}
%env TIER BASIC
%%bash
echo $OUTDIR $DATA $REGION $JOBNAME
gsutil -m rm -rf $OUTDIR
gcloud ml-engine jobs submit training $JOBNAME \
   --region=$REGION \
   --module-name=$PKG_NAME.task \
   --package-path=${PWD}/src/$PKG_NAME \
   --staging-bucket=gs://$BUCKET \
   --scale-tier=$TIER \
   --python-version 3.5 \
   --runtime-version=$TFVERSION \
   -- \
   --data_path=$DATA \
   --output_dir=$OUTDIR \
   --train_steps=5000 \
   --job_dir=$OUTDIR/jobs
Fetch logs from ml-engine job
%%bash
echo $JOBNAME
gcloud ml-engine jobs describe $JOBNAME
%%bash
gcloud ml-engine jobs stream-logs $JOBNAME
Don't be concerned if the notebook appears stalled (with a blue progress bar) or returns with an error about being unable to refresh auth tokens. This is a long-lived Cloud job and work is going on in the cloud.
Use the Cloud Console link to monitor the job and do NOT proceed until the job is done.
ML-Engine with Hyperparameter search
- Bayesian approach to find optimal hyperparameters, see
Golovin et.al (2017): Google Vizier: A Service for Black-Box Optimization
- consecutive search, here
- 2 trials in parallel
- a total of 30 trials
see
hyperp_config.yaml:train_batch_sizehidden_units
Pick an algorithm to search Hyperparameter space
ALGORITHM_UNSPECIFIED: Bayesian SearchGRID_SEARCHRANDOM_SEARCH
Configure Search in hyperp_config.yaml:
%%writefile hyperp_config.yaml
trainingInput:
  hyperparameters:
    goal: MAXIMIZE
    hyperparameterMetricTag: accuracy
    maxTrials: 30
    maxParallelTrials: 4
    algorithm: ALGORITHM_UNSPECIFIED
    params:
      - parameterName: train_batch_size
        type: INTEGER
        minValue: 64
        maxValue: 512
        scaleType: UNIT_LINEAR_SCALE
      - parameterName: hidden_units
        type: CATEGORICAL
        categoricalValues: ["256 128 64", "128 64 32", "512 256 128 64", "256 128 64 32"]
      - parameterName: learning_rate
        type: DOUBLE
        minValue: 0.0001
        maxValue: 0.1
        scaleType: UNIT_LOG_SCALE
# Set JOBNAME environment variable
import datetime
JOBNAME_HYPER = "mnist_{}_hyper".format(datetime.datetime.now().strftime("%y%m%d_%H%M%S"))
%env JOBNAME_HYPER {JOBNAME_HYPER}
# Set new OUTPUT and DATA directory in GS
OUTDIR_HYPER = '/'.join(['gs:/', BUCKET, JOBNAME_HYPER])
DATA = '/'.join(['gs:/', BUCKET, PKG_NAME, 'data', 'mnist.npz'])
%env OUTDIR_HYPER $OUTDIR_HYPER
%env DATA $DATA
%env TIER STANDARD_1
Start Bayesian Hyperparameter Search:
- add
configparameter withhyperp_config.yamlas argument: - one can add other parameter to
hyperp_config.yaml, see docs on submitting
%%bash
echo $OUTDIR_HYPER $DATA $REGION $JOBNAME_HYPER
gcloud ml-engine jobs submit training $JOBNAME_HYPER \
   --region $REGION \
   --module-name $PKG_NAME.task \
   --package-path ${PWD}/src/$PKG_NAME \
   --staging-bucket gs://$BUCKET \
   --scale-tier $TIER \
   --python-version 3.5 \
   --runtime-version $TFVERSION \
   --config hyperp_config.yaml \
   -- \
   --data_path $DATA \
   --output_dir $OUTDIR_HYPER \
   --train_steps 5000 \
   --job_dir $OUTDIR/jobs
!gcloud ml-engine jobs describe $JOBNAME_HYPER
Get results from job using API
See client documentation on ml-engine and ml.projects().jobs().get() method.
Using requests-package
- can work behind a proxy if
HTTPS_PROXYis defined and/or a specific SSL certificte is neededREQUESTS_CA_BUNDLE:REQUESTS_CA_BUNDLE: optional, filepath to your SLL-certificateHTTPS_PROXY: optional, link to your proxy, possibly includign authentification or ports
import subprocess
import requests
import json
import os
# all jobs
url = 'https://ml.googleapis.com/v1/projects/{project}/jobs'.format(project=PROJECT)
headers = {
   'Content-Type': 'application/json',
   'Authorization':  'Bearer {}'.format(subprocess.run('gcloud auth print-access-token', shell=True, check=True,
                                                       stdout=subprocess.PIPE).stdout.decode().replace(os.linesep, ''))
}
json_response = requests.get(url=url, headers=headers)
json.loads(json_response.text)
# current Hyperparameter Training Job
jobname = os.environ['JOBNAME_HYPER']
url = 'https://ml.googleapis.com/v1/projects/{project}/jobs/{jobname}'.format(project=PROJECT, jobname=jobname)
json_response = requests.get(url=url, headers=headers)
json.loads(json_response.text)
Using googleapiclient.discorvery
- does most likely won't work if you are behind a proxy
- would need configuration of
httplib2.HTTPinstance
- would need configuration of
from googleapiclient import discovery
ml = discovery.build('ml', 'v1')
ml.projects().jobs().list(parent='projects/{}'.format(PROJECT)).execute()
from googleapiclient import discovery
from googleapiclient import errors
from pprint import pprint

def get_job_results(jobname, project=PROJECT):
    """
    Builds a discovery client with GCMLE endpoint.
    """
    ml = discovery.build('ml', 'v1')
    endpoint = 'projects/{project}/jobs/{jobname}'.format(
        project=project, jobname=jobname)
    print("API endpoint: {}".format(endpoint))
    request = ml.projects().jobs().get(name=endpoint)
    try: # Make the call.
        response_dict = request.execute()
        pprint(response_dict)
    except errors.HttpError as err:
        print('There was an error creating the model. Check the details:')
        print(err._get_reason())
        raise
    return response_dict

get_job_results(os.environ['JOBNAME_HYPER'])
Excursus: Check Results in TensorBoard
- metrics and variables are inspected from the logs, called checkpoints (
ckpt) - Dashboard on localhost:
TensorBoard
Inspect Model trained on your machine by starting a local tensorboard server:
tensorboard --logdir trained/pkg_mnist_fnn/
Screenshot of Tensorboard

Excursus: Load data from the bucket
- Binary Object has to be read by
BytesIOmodule
from google.cloud import storage
from io import BytesIO
import numpy as np

storage_client = storage.Client(project=PROJECT) # use current gcloud PROJECT_ID
bucket = storage_client.get_bucket(BUCKET)
blob = bucket.blob("pkg_mnist_fnn/data/mnist.npz")

data = blob.download_as_string()
data = BytesIO(data)
data = np.load(data)
with data as f:
    x_train, y_train = f['x_train'], f['y_train']
    x_test, y_test = f['x_test'], f['y_test']
y_test.shape
Deploy model - from any previous step (DSP 2.5)
tf.estimator.LatestExporteris used to store a model for deployment in the cloud- See also:
tf.estimator.export,tf.saved_model
Check that a model has been saved on your Bucket:
get best model found in from Hyperparameter Tuning
get_job_resultsis defined before
#%env JOBNAME_HYPER mnist_190427_132255_hyper  # uncomment and set
job_details = get_job_results(os.environ["JOBNAME_HYPER"])
best_run = job_details['trainingOutput']['trials'][0]
print("Run with best performance on chosen metrics:\n{}".format(best_run))
%env TRIAL_ID {best_run['trialId']}
models = !gsutil ls gs://$PROJECT/$JOBNAME_HYPER/$TRIAL_ID/export/exporter/
models
Use best model from Hyper-Parameter Tuning Job (Query is shown before)
%env MODEL_LOCATION={models[-1]}
Deploy
Identifier for deployed model:
MODEL_NAMEMODEL_VERSION
%env MODEL_NAME MNIST_MLENGINE
%env MODEL_VERSION v1
Create: A model (Dataset) has different versions (Tables) - (comp. to BQ Datasets and Tables)
%%bash
gcloud ml-engine models   create ${MODEL_NAME} --regions $REGION
gcloud ml-engine versions create ${MODEL_VERSION} --model ${MODEL_NAME} \
     --origin ${MODEL_LOCATION} \
     --runtime-version $TFVERSION \
     --python-version 3.5
Predictions
- Using the Model saved by Python Module
- Using Model saved by
ml-engine local - Using Model trained online
Tools get predictions:
- Command Line Interfaces
gcloud ml-engine local predictgcloud ml-engine predict
- Python Client
Create an test-image in numpy format
- Add filename to config-file
- Create file containing
Nexamples
# add filename to config-file
import yaml
N=4
testdatafile = "data/mnist/json/ml_engine_testdatafile_N{}.json".format(N)
with open("config.yaml", "r", encoding = "utf8") as f:
    config = yaml.load(f)
with open("config.yaml", "w", encoding = "utf8") as f:
    config['testdatafile'] = testdatafile
    yaml.dump(config, stream=f,  default_flow_style=False)
TEST_DATA_JSON = testdatafile
%env TEST_DATA_JSON $testdatafile
# Create a file with 4 test images
import numpy as np
import json
from src.pkg_mnist_fnn.utils import load_data
from src.pkg_mnist_fnn.model import parse_images
(_,_), (x_test, y_test) = load_data(path='data/mnist/raw/mnist.npz')
test_indices = np.random.randint(low=0, high=len(y_test), size=N)
x_test, y_test = x_test[test_indices], y_test[test_indices]
x_test = parse_images(x_test).tolist()

#eol = os.linesep
#print(eol)
n_lines = len(y_test)
with open(testdatafile, "w") as f:
    for image, label in zip(x_test, y_test):
        _dict = {"x": image} #, "y": int(label)}
        f.write(json.dumps(_dict)+ "\n")
print("Wrote to {}".format(testdatafile))
Let's look at our four examples
from src.utils.mnist_utils import plot_mnist_testdata
plot_mnist_testdata(TEST_DATA_JSON)
ML-Engine: ml-engine local predict
- Using Model saved
- Python module
ml-engine local
model_dir = os.listdir("{}/export/exporter".format(OUTDIR_local))[-1]
%env model_dir=$model_dir
%%bash
model_dir=$(ls $OUTDIR_LOCAL/export/exporter/ | tail -1)
echo "Selected Model:  $model_dir"
gcloud ml-engine local predict \
    --model-dir=${PWD}/$OUTDIR_LOCAL/export/exporter/${model_dir} \
    --json-instances=$TEST_DATA_JSON \
    --verbosity debug > data/test_predictions
cat data/test_predictions
%%bash
gcloud ml-engine predict --model=MNIST_MLENGINE --version=v1 --json-instances=$TEST_DATA_JSON
import datetime
JOBNAME_BATCH_PRED = 'BATCH_' + datetime.datetime.now().strftime("%y%m%d_%H%M%S")
%env JOBNAME_BATCH_PRED {JOBNAME_BATCH_PRED}
%env DATA_FORMAT text
%env OUTPUT_PATH {'/'.join([os.path.split(OUTDIR)[0], "batch_pred/"])}
%env TEST_DATA_GS {'/'.join([os.path.split(DATA)[0], os.path.split(TEST_DATA_JSON)[1]])}_
Copy files
!gsutil cp data/mnist/json/ml_engine_testdatafile_N4.json $TEST_DATA_GS
Submit job using gcloud functionality
!gcloud ml-engine jobs submit prediction $JOBNAME_BATCH_PRED --model=MNIST_MLENGINE --version=v1 --input-paths=$TEST_DATA_GS --output-path $OUTPUT_PATH --region $REGION --data-format $DATA_FORMAT
Retrieve results from batch and parse them
files = !gsutil ls $OUTPUT_PATH
print(files)
from google.cloud import storage
import json
mybucket= storage.Client(project=PROJECT).get_bucket('{}'.format(BUCKET))
file = files[1].split("{}".format(BUCKET + "/"))[1]
print("Get file {}".format(file))
blob= mybucket.blob(file)
result = blob.download_as_string()

result = [json.loads(x) for x in (result.decode().split("\n"))[:-1]]
print(result[0])
Online Predictions
Get predictions using the Python-Client-Library, see Tutorial.
service account authentification: link
MODEL_NAME = 'MNIST_MLENGINE'
VERSION = 'v1'
print(PROJECT)
Load data into python:
import json
instances = []
with open(TEST_DATA_JSON, "r") as f:
    data = f.readlines()
instances = [json.loads(x) for x in data]   # for discovery-client
data = [image['x'] for  image in instances] # for requests-package
Using requests-package
- see hints above on possiblity to configure proxy
import subprocess
import requests
import os
from pprint import pprint
url = 'https://ml.googleapis.com/v1/projects/{project}/'
      'models/{model}/versions/{version}:predict'.format(
        project=PROJECT, model=MODEL_NAME, version=VERSION)
headers = {
   'Content-Type': 'application/json',
   'Authorization':  'Bearer {}'.format(
       subprocess.run('gcloud auth print-access-token',
                       shell=True, check=True,
                       stdout=subprocess.PIPE).stdout.decode().replace(
                                                       os.linesep, '')
                      )
}
request_data = {"instances":
    data
}
print(headers)
json_response = requests.post(url=url, data=json.dumps(request_data), headers=headers)
pprint(json.loads(json_response.text))
Using googleapiclient.discovery
- fails behind proxy due to SSL verification (which could not be deactivated) #### Authentification
from googleapiclient import discovery
api = discovery.build(serviceName='ml', version='v1',
                      discoveryServiceUrl='https://www.googleapis.com/discovery/'
                                          'v1/apis/{api}/{apiVersion}/rest'
                     )
Picks up per default GCLOUD SDK authentification:
UserWarning: Your application has authenticated using end user credentials from Google Cloud SDK. We recommend that most server applications use service accounts instead. **If your application continues to use end user credentials from Cloud SDK, you might receive a "quota exceeded" or "API not enabled" error**. For more information about service accounts, see https://cloud.google.com/docs/authentication/
warnings.warn(_CLOUD_SDK_CREDENTIALS_WARNING)
Get predictions for samples
project_id = 'projects/{project}/models/{model}/versions/{version}'.format(
              project=PROJECT, model=MODEL_NAME, version=VERSION)
print("Endpoint to use: {}\n".format(project_id))
request_data = {"instances":
    instances
}
request = api.projects().predict(body=request_data, name=project_id).execute()
pprint(request)
for i, pred in enumerate(request['predictions']):
    print("Predicted class: {}, True Class:\t{}".format(
        pred['classes'][0],
        y_test[i]))
Recap
Outlook
- Add different models types
- different layers of abstraction in tensorflow
- sklearn
- Show how to use
ml-enginein SQL in BigQuery
Appendix
Notes on Jupyter Slides
- Activate: View -> Cell Toolbar -> Slideshow
- Install nbextensions into
baseconda environment- activate split cells vertically
- Code folding
- Table of Contents
- RISE for interactive presentations